Parallelism in Xircuits
Xircuits supports multithreading for parallel execution of workflows, particularly useful for I/O-heavy tasks. This guide will show you how to implement multithreading in your Xircuits workflows using the RunParallelThread and AwaitFutures components.
Introduction
Multithreading in Xircuits allows for concurrent task execution, which is especially beneficial for operations like network requests or independent data processing.
Prerequisites
- Latest version of Xircuits
- Updated
base.pyfile in thexai_componentsdirectory
Implementing Multithreading
Step 1: Set Up Your Workflow
Create a new workflow or open an existing one where you want to use multithreading.
Step 2: Add Parallel Execution Components
- Drag the
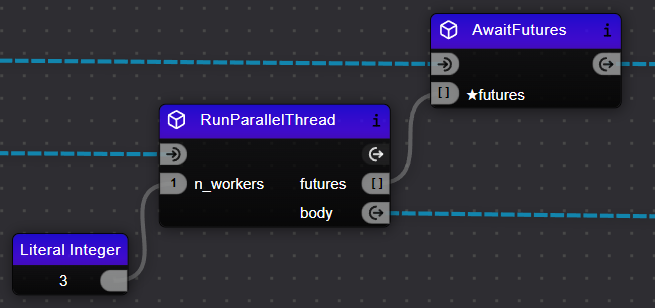
RunParallelThreadcomponent into your workflow. - Configure it to define the workflow segment for parallel execution.
- Connect the tasks you want to execute in parallel to the
bodyflow execution ofRunParallelThread. - Add the
AwaitFuturescomponent in the main flow path. - Connect the
futuresoutPort ofRunParallelThreadto thefuturesinPort ofAwaitFutures.

Step 3: Use Branch Components
You will need to use Branch Components to separate the parallel execution from the main flow. The RunParallelThread should be in the body flow execution path of a branch component, while AwaitFutures remains in the main flow path.
Common branch components include:
ForEach: Iterates over a list of itemsWhile: Looping based on a condition
Step 4: Example Workflow
Let's look at the RunParallelExample.xircuits workflow:

In this example:
- We use a
ForEachcomponent as our branch. - The
RunParallelThreadis placed in thebodyflow of theForEach. - The tasks to be executed in parallel (random sleep and print) are connected to the
bodyflow ofRunParallelThread. - The
AwaitFuturescomponent is in the main flow path, after theForEach. - The
futuresoutPort ofRunParallelThreadis connected to thefuturesinPort ofAwaitFutures.
This setup allows each iteration of the ForEach loop to start a new thread, executing the sleep and print operations in parallel.
Step 5: Run the Workflow
- Compile your workflow.
- Run it to observe the parallel execution in action.
Expected Output
======================================
__   __  ___                _ _
\ \  \ \/ (_)_ __ ___ _   _(_) |_ ___
 \ \  \  /| | '__/ __| | | | | __/ __|
 / /  /  \| | | | (__| |_| | | |_\__ \
/_/  /_/\_\_|_|  \___|\__,_|_|\__|___/

======================================

Xircuits is running...

Executing: RunParallelExample
Executing: RunParallelThread
Executing: GetRandomNumber
Executing: SleepComponent
Sleeping for 3 seconds.
...
Executing: AwaitFutures
Executing: RunParallelThread
Executing: Print
1
...
Executing: Print
4

Finished Executing
Conclusion
By integrating multithreading into your Xircuits workflows, you can significantly improve efficiency for time-consuming operations. Use the RunParallelThread and AwaitFutures components in conjunction with branch components to leverage concurrent execution in your projects. Remember to keep RunParallelThread in the branch's body flow and AwaitFutures in the main flow for proper parallel execution.
Additional Notes
Due to Xircuits' architecture where all components are instantiated at startup, creating custom parallel versions of branch components (like a modified ForEach) can lead to memory overwrites and unpredictable behavior. Components share the same memory space across threads, causing race conditions when setting output values. For complex parallel operations, consider creating self-contained components that handle all logic internally rather than attempting to parallelize existing branch structures. This is planned to be improved in a major patch.