Creating Components with Xircuits
Now that you've mastered the basics of Xircuits and created your first visual workflow from scratch, you're ready to take your skills to the next level. In the previous tutorials, you learned how to use existing components to build workflows. But what if you want to create your own reusable components?
Imagine you've been working on a project that involves repeating certain sequences of operations across multiple workflows. Instead of recreating these sequences each time, wouldn't it be great if you could package them into a single, reusable component? That's exactly what we're going to learn in this tutorial.
In this guide, we'll show you how to create your own custom components in Xircuits, using workflow components. You'll learn how to encapsulate logic, make your components flexible with Arguments, and use them in larger workflows. This skill will not only save you time but also make your workflows more modular and easier to maintain.
Let's dive in and start creating your first custom Xircuits component!
Setting Up and Creating Your First Workflow Component
To begin, you have two options:
- Use the
HelloTutorial.xircuitsfrom the first tutorial. - Create a new workflow from scratch.
If you're creating a new workflow:
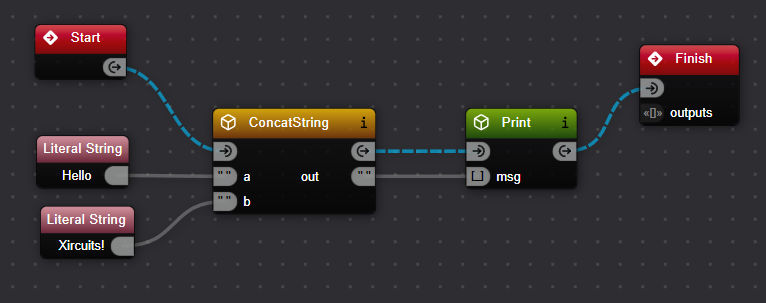
- Add the
ConcatStringandPrintcomponents to your canvas. - Add two Literal components and connect them to the ConcatString component.
- Set one Literal to "Hello " and the other to "Xircuits!".
- Connect the output of
ConcatStringto the input ofPrint.
Your workflow should look like this:
To create your first workflow component:
- Save your workflow with a descriptive name (e.g., "HelloXircuits.xircuits").
- Compile the workflow to generate a Python script. This step is crucial for Xircuits to recognize your workflow as a component.
Optionally, you can run the workflow to verify its output. You should see "Hello Xircuits!" printed if you do.
Now that we've set up our initial workflow and compiled it, it's ready to be used as a component. In the next section, we'll learn how to incorporate this newly created component into a larger workflow.
Using Your Workflow Component
Now, let's use this component in a new workflow:
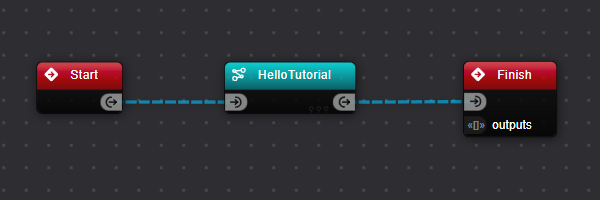
- Start a new workflow in Xircuits.
- Look for your workflow component in the component library tray. It will have the same name as its filename.
- Drag and drop your workflow component into the new workflow.
- Connect the Start node to your component, and your component to the Finish node.
- Compile and run this new workflow.
You should see the same output as before: "Hello Xircuits!". However, you're now effectively executing a workflow in another workflow. Congratulations! You've just created and used your first workflow component.
Enhancing Workflow Flexibility with Arguments
While your component works, it's not very flexible. Let's modify it to accept custom inputs:
- Go back to your original workflow.
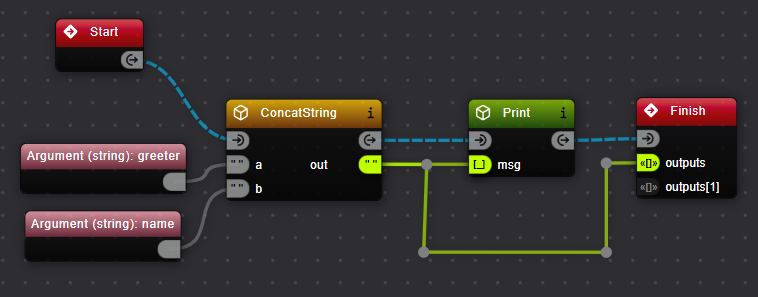
- Replace the Literal components with
Argument Stringcomponents:- For the greeting (e.g., "Hello "), replace it with an Argument String named "greeter".
- For the name (e.g., "Xircuits!"), replace it with an Argument String named "name".
- Connect these new Argument components to the appropriate inputs of the
ConcatStringcomponent. - Connect the output of the
ConcatStringcomponent to theFinishcomponent'soutputsport. - Save your changes and compile the workflow.
Using Your Enhanced Workflow Component
Now that you've modified your workflow:
- Double check that you've saved your changes and compiled the workflow. If you haven't - it won't be updated!
- Go back to your second workflow (or create a new one).
- Replace the previous version of your component with this new, argument-enabled version.
- You'll notice that your component now has input ports for "greeter" and "name".
- Add two Literal components to provide values for these inputs.
- Connect everything and run the workflow.

Expected Output
======================================
\ \ \ / () __ ___ _ () |_ ___
\ \ \ /| | '/ | | | | | / |
/ / / | | | | (| || | | |_
// //__|| _|_,||_|_/
======================================
Xircuits is running...
Executing: NewWorkflow
Executing: HelloTutorial
Executing: ConcatString
Executing: Print
Greetings User!
Executing: PrettyPrint
'Greetings User!'
Finished Executing
Benefits of Argument-Based Components
By replacing Literals with Argument components, you've made your workflow component much more flexible:
- The "greeter" and "name" Arguments create inPorts on your workflow component, allowing users to input custom values.
- The connection to the
Finishcomponent's outPort creates an outPort for your component's results, making the output accessible in larger workflows. - You can now reuse this component with different inputs without modifying the original workflow.
Try changing the values in the Literal components connected to your workflow component. You'll see that you can now customize the greeting and name each time you use the component.
Conclusion
You've learned how to create a simple workflow, turn it into a component, use that component in a larger workflow, and then enhance it with arguments for greater flexibility. This skill will help you build more efficient and modular projects with Xircuits. From here, you can explore more complex workflows and dive deeper into visual programming with Xircuits.