Creating Your First Visual Workflow From Scratch
In the previous tutorial, you learned how to run and modify prebuilt Xircuits workflows by adjusting parameter components. While this is a great starting point, Xircuits offers much more flexibility. You can create your own custom workflows from scratch, combining components from various libraries we support. This tutorial will guide you through the process of building a more complex workflow, introducing you to the component library, how to install remote libraries, and showing you how to add and mix different components to create a powerful, customized solution.
Creating a New Workflow File
Let's begin by setting up a new workflow in Xircuits:
- In the Launcher interface, click on
Others > Xircuits Fileto create a new workflow file. - Name your file
MyFirstWorkflow.xircuits. - You'll see a
StartandFinishnode automatically placed on the canvas. These nodes mark the beginning and end of your workflow.
Navigating the Component Library
The component library is your toolbox for building workflows. Let's explore how to use it effectively.
Adding Your First Component
- On the left side of the Xircuits interface, click on the cube-like icon to open the component library tray.
- Use the search bar at the top to find the
HelloComponent. Drag it onto the canvas. - Connect the
Startnode to theHelloComponentnode by dragging from theStartarrow outPort to theHelloComponentarrow inPort. - Click
Saveand thenCompileto generate a Python script with the same name as your.xircuitsfile. - Run the workflow by clicking the 'Run' button. You should see an output like "Hello, User!" or a similar greeting.
Expanding Your Component Library
Sometimes, you might need a library that isn't installed. Here's how to add it:
- In the component library tray, look for libraries listed under
Available for Installation. - To install a library, click on the
...next to it and selectInstall. The library will be cloned to thexai_componentsdirectory. - You'll be prompted to choose a kernel, which will execute the
pip installcommand to install the library.
For this tutorial, let's install the Tensorflow Keras library:
- Click on the
...next toTENSORFLOW_KERASand selectInstall. - Follow the prompts to complete the installation.
Once installed, the new components will be available in your library.
Constructing a More Complex Workflow
Now, let's create a machine learning workflow by adding and connecting multiple components. You can reuse the previous canvas or create a new one.
Assembling the Core Components
-
Search for and drag these components onto the canvas, connecting them in this order:
ReadKerasDataSet(connect toStartnode)TrainTestSplit(connect toReadKerasDataSet)KerasCreate2DInputModel(connect toTrainTestSplit)KerasTrainImageClassifier(connect toKerasCreate2DInputModel)KerasEvaluateAccuracy(connect toKerasTrainImageClassifier)- Connect
KerasEvaluateAccuracyto theFinishnode to complete the workflow.
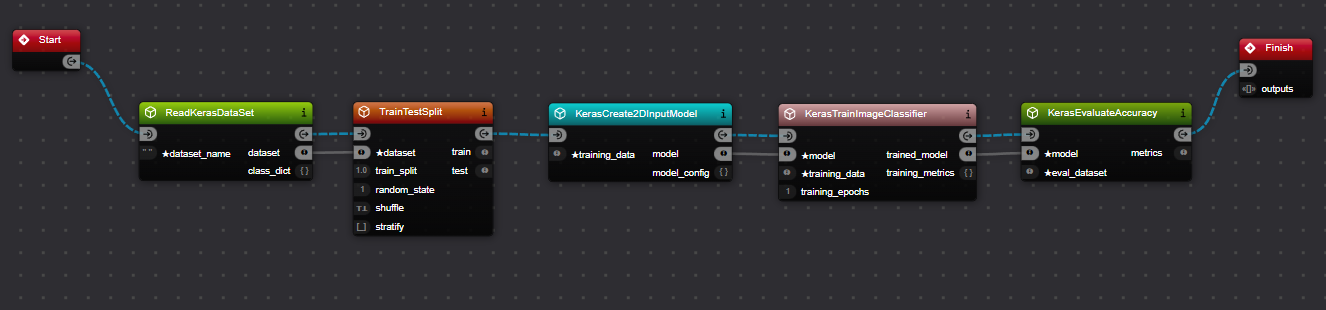
Connecting the Components Notice how Xircuits automatically connects some ports for you. For example, when you connect
ReadKerasDataSettoTrainTestSplit, thedatasetoutPort ofReadKerasDataSetis automatically connected to thedatasetinPort ofTrainTestSplit. A smart linking feature helps connect ports with similar names and compatible types.
Completing Compulsory Connections
Try running the workflow now. You'll likely encounter an error message: "Please connect all [★]COMPULSORY InPorts." In Xircuits, ports marked with a ★ are compulsory and must be connected.
Take a moment to observe which compulsory inPorts aren't connected yet. Can you make educated guesses on how to connect them?
Here's what you need to do:
-
Connect
TrainTestSplit'strainoutPort to bothKerasCreate2DModel's andKerasTrainImageClassifier'straining_datainPort. -
Connect
TrainTestSplit'stestoutPort toKerasEvaluateAccuracy'seval_datasetinPort.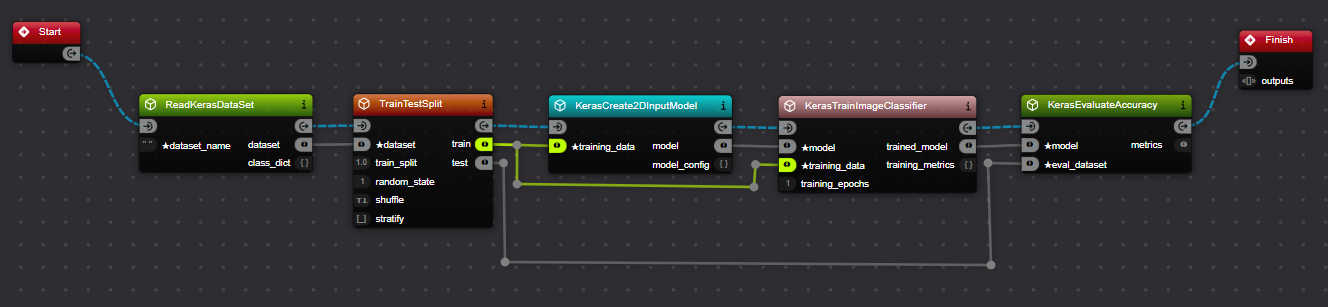
Providing Data between Components Hovering over a link or port will highlight the connections.
If you find it difficult to see or manage connections between components, you can create custom routes for better clarity. Simply hold the Ctrl key and click on a link to create waypoints along the connection line, allowing you to route it around other components or organize your workflow visually.
Modifying Workflow Behavior with Parameter Components
Parameter components allow you to set fixed values that can be used by other components in the workflow. Let's add some parameters using two different methods:
Method 1: Dragging Components from the Tray
- Drag a
Literal Stringcomponent onto the canvas from the component tray. - Set its value to "mnist".
- Connect this
Literal Stringcomponent to thedataset_nameinput port of theReadKerasDataSetcomponent.
Method 2: Pulling Out a Link from the Port
- Click on the
training_epochsinput port of theKerasTrainImageClassifiercomponent. - Drag outwards to create a link. This will automatically spawn the appropriate input dialogue.
- In the dialogue that appears, enter the integer value 5.
- Press Enter to confirm the value.
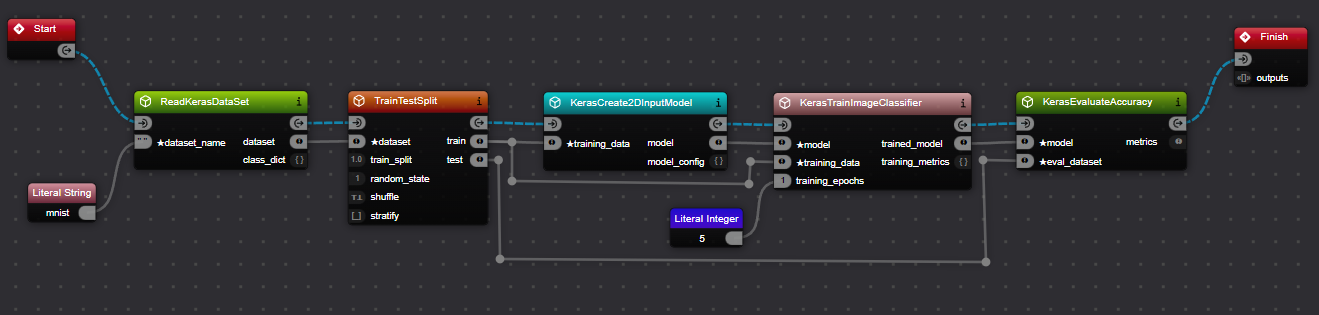
Both methods achieve the same result, creating parameter components that feed values into your workflow. The second method can be quicker as it automatically creates the correct type of literal component based on the port you're connecting to.
Using parameter components like these helps in making workflows flexible and easily configurable. You can easily change these values to adjust your workflow's behavior without modifying the core components.
Try both methods and see which one you prefer. As you become more comfortable with Xircuits, you'll likely find yourself using a combination of both techniques depending on the situation.
Launching Your Workflow
Now it's time to see your creation in action:
- Press the
Save & Compilebutton. - Select the Python kernel to execute the workflow.
You should see output similar to this:
======================================
__   __  ___                _ _
\ \  \ \/ (_)_ __ ___ _   _(_) |_ ___
 \ \  \  /| | '__/ __| | | | | __/ __|
 / /  /  \| | | | (__| |_| | | |_\__ \
/_/  /_/\_\_|_|  \___|\__,_|_|\__|___/
======================================
Xircuits is running...
Executing: ReadKerasDataSet
Executing: TrainTestSplit
Executing: KerasCreate2DInputModel
Executing: KerasTrainImageClassifier
Epoch 1/5
...
Executing: KerasEvaluateAccuracy
{'loss': '0.07967730611562729', 'accuracy': '0.975803554058075'}
Finish Executing
Congratulations! You've just created a complex workflow from scratch, installed necessary libraries, and learned how to use literal components to customize your workflow parameters. As you become more comfortable with Xircuits, try exploring more components and creating more intricate workflows.