Creating Custom Components with Python
Welcome to the next level of using Xircuits! In this tutorial, you'll learn how to create custom components when the existing library doesn't quite meet your needs. We'll walk through the process of identifying gaps in functionality, designing solutions, and implementing them as new Xircuits components. This tutorial assumes that you have already covered the first two tutorials and have basics in Python.
The Power of Custom Components
One of the most powerful features of Xircuits is its extensibility. While the platform comes with a wide range of built-in components, you may encounter situations where you need functionality that doesn't exist yet. This is where the ability to create custom components becomes invaluable.
Whether you're working with unique data formats, implementing specialized algorithms, or integrating with external systems, custom components allow you to extend Xircuits to meet your specific requirements. By creating your own components, you can:
- Fill gaps in the existing component library
- Implement domain-specific functionality
- Optimize workflows for your particular use cases
- Integrate with proprietary or specialized systems
Let's explore how you can leverage this capability to enhance your Xircuits workflows.
Creating a Custom Component Library
When you need functionality that doesn't exist yet, it's time to create your own component. Let's start by setting up a custom component library:
-
Create a New Directory: Inside the
xai_componentsdirectory, create a new folder namedxai_new_library. Note that the prefixxai_is required for all custom component libraries. -
Initialize the Library: Create an
__init__.pyfile insidexai_new_libraryto make it a Python package.
Alternatively, you can add your custom components to an existing library by creating a new Python file within that library's directory. This approach can be useful when your new component is closely related to existing component library.
Developing a Custom Component
Now, let's walk through the process of creating a custom component. For this example, we'll create a component that calculates the difference between two dates, but remember that this process can be applied to any functionality you need.
-
Create Component File: Create a new file named
DateComponents.pyinsidexai_new_library. -
Add Essential Imports:
from xai_components.base import InArg, InCompArg, OutArg, Component, xai_component -
Define the Component Class:
@xai_componentclass DateDifference(Component):"""Calculates the number of days between two dates.##### inPorts:- year1 (str): The year of the first date. Compulsory.- month1 (str): The month of the first date. Compulsory.- day1 (str): The day of the first date. Compulsory.- year2 (str): The year of the second date. If not provided, current year is used.- month2 (str): The month of the second date. If not provided, current month is used.- day2 (str): The day of the second date. If not provided, current day is used.##### outPorts:- days_difference (int): The number of days between the two dates."""year1: InCompArg[str]month1: InCompArg[str]day1: InCompArg[str]year2: InArg[str]month2: InArg[str]day2: InArg[str]days_difference: OutArg[int]def execute(self, ctx) -> None:from datetime import datetimedate1 = datetime(int(self.year1.value), int(self.month1.value), int(self.day1.value))if self.year2.value and self.month2.value and self.day2.value:date2 = datetime(int(self.year2.value), int(self.month2.value), int(self.day2.value))else:date2 = datetime.now()difference = abs((date2 - date1).days)self.days_difference.value = difference -
Don't forget to save it.
You can also use the Xircuits Create New Component interface to create components.
Preview
Understanding the Component Structure
Let's break down the key elements of our custom component:
- @xai_component: This decorator marks the class as a Xircuits component.
- InArg, InCompArg, and OutArg: These define the input and output ports for the component. InCompArg is used for compulsory inputs.
- execute method: This is where the main logic of the component is implemented.
Integrating Your Custom Component
Once you've created your new component, it's time to use it in Xircuits:
-
Refresh the Component Tray: After pressing save in the text editor, the component should appear in the tray. If not, press the refresh button on the component tray. Your custom
DateDifferencecomponent should now appear and be usable in the Xircuits canvas. -
Create a Workflow: Now you can drag and drop your new
DateDifferencecomponent onto the canvas and connect it with other components.
Example Workflow
Let's create a workflow that calculates the number of days between the current date and a fixed date:
-
Add Components:
Start->GetCurrentDate->DateDifference->Print->Finish- Add three
Literalcomponents for the year, month, and day of the fixed date
-
Configure and Run:
- Use
GetCurrentDateto get the current date. - Connect the
year,month, anddayoutputs fromGetCurrentDateto theyear2,month2, andday2inputs ofDateDifferencerespectively. - Use
Literalcomponents to provide a fixed date (e.g., "2023", "1", "1" for January 1, 2023). - Connect these
Literalcomponents to theyear1,month1, andday1inputs ofDateDifference. - Link the
days_differenceoutput to thePrintcomponent.
- Use
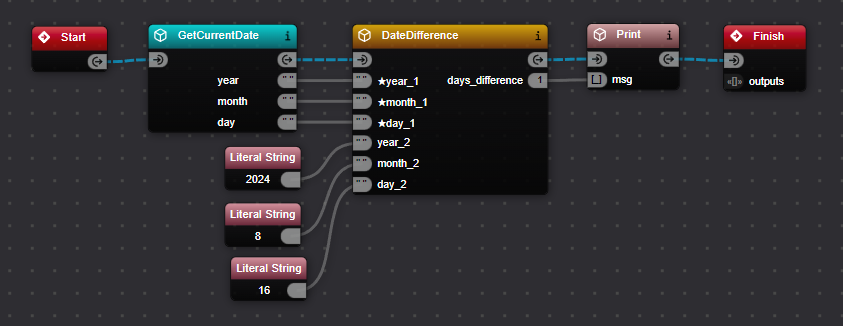
- Expected Output:
The difference between 2023-01-01 and the current date is X days.
Best Practices for Creating Custom Components
When creating your own components, keep these best practices in mind:
- Clear Documentation: Include a clear docstring explaining what the component does, its inputs, and its outputs.
- Modularity: Design your component to be as modular and reusable as possible.
- Use Appropriate Port Types: Use InCompArg for compulsory inputs and InArg for optional inputs. This helps users understand which inputs are required.
- Specify Data Types: Always specify the expected data types for your input and output ports.
- Single Imports: For single imports that are only used within the execute method, you can add them directly to the execute section to avoid polluting the global imports.
In the XpressAI platform, you can leverage the chat assistant to generate components for you. This powerful feature can significantly speed up your component creation process and help you get started quickly with custom functionality.
Conclusion: What You've Learned
In this tutorial, you've gained valuable skills in extending Xircuits' functionality:
-
Creating Custom Libraries: You learned how to set up a new component library with the required
xai_prefix. -
Developing Custom Components: You explored the process of creating a new component, including defining input and output ports, and implementing the core logic.
-
Understanding Component Structure: You gained insight into the key elements of a Xircuits component, such as the
@xai_componentdecorator, different types of ports (InArg, InCompArg, OutArg), and theexecutemethod. -
Integrating Custom Components: You learned how to incorporate your new component into a Xircuits workflow and connect it with existing components.
-
Best Practices: You were introduced to important considerations for creating robust, well-documented, and reusable components, including the use of compulsory ports and specifying data types.
By mastering these skills, you've significantly expanded your ability to create tailored, efficient workflows in Xircuits. Remember, the ability to create custom components allows you to overcome limitations, optimize your processes, and tackle unique challenges in your data processing and analysis tasks.
As you continue your journey with Xircuits, keep exploring new ways to extend its capabilities through custom components. With these tools at your disposal, you're well-equipped to handle a wide range of data processing challenges and create sophisticated, customized workflows.